Deploying open-source Airy and Rasa as an enterprise-grade Conversational AI platform
Create an open-sourced, fully-featured, production-ready conversational platform in the cloud, using open-source tools running on Kubernetes.


With conversational use cases on the rise and Conversational AI becoming more and more relevant, the need for an open-source Conversational AI platform is clear.
But what is part of such a conversational platform? How do you set it up, host it and run it? How do you connect it to your Conversational AI?
This post will outline how to create a working conversational platform in the cloud, using open source tools running on Kubernetes.
The building blocks of our conversational stack will be:
- Kubernetes - The system which will hold all of the created resources.
- Apache Kafka - Message streaming & queuing framework, as a base for Airy.
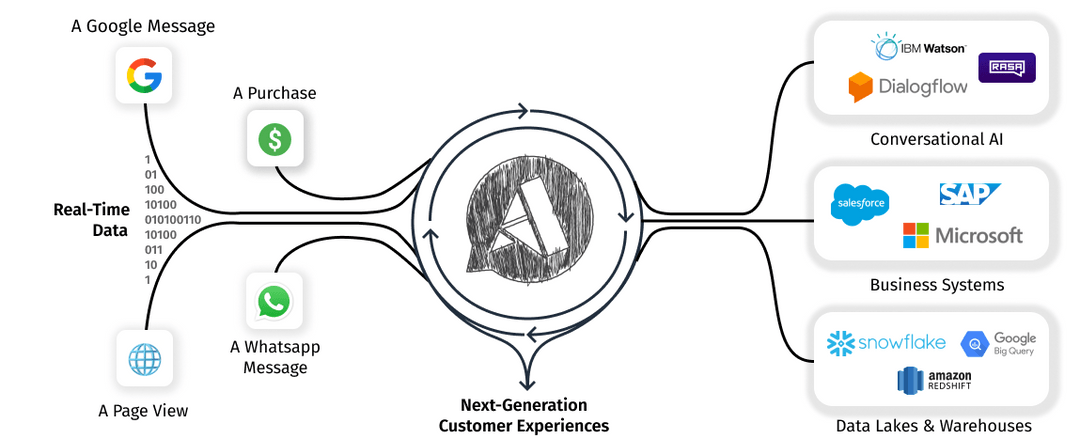
- Airy - Our open source conversational platform, responsible for transporting messages, streaming them from and to the different conversational channels.
- Rasa - Open source conversational AI, responsible for analyzing the message content and creating an automated response message.
- A conversational channel: Airy's open source Live Chat plugin - An example conversational channel which is connected to the Airy platform and a live chat plugin that can be embedded into any webpage to chat with website visitors.
By the end of the tutorial you will have a Kubernetes cluster with two namespaces, one each for Airy and Rasa. You will also have a chat plugin as a source for Airy, where people can write you messages and then get customized automated replies. The chat plugin can be tested on its own, but can also be added directly to your website. In the What is next? section, you will be presented with other options to further expand your conversational platform.
Let's first go over some questions on the architectural choices of your conversational platform:
Why do we need a streaming platform?
Fetching messages and conversations from a conversational channel, or source as we call it, can be accomplished in various ways. However, if we want to be able to connect multiple sources, scale the platform in the future as the volume of messages increases, and process the messages in real-time and in a specific order - a streaming platform such as Kafka is the best choice.
This way, we leverage the capabilities of a modern streaming platform to simplify the design and the message processing of our microservices. Instead of them talking to each other, they will communicate exclusively through Kafka.
Why Kubernetes?
All the apps and components we use as building blocks of our conversational stack can be started without Kubernetes. However, using a modern orchestration system, such as Kubernetes, that takes care of scheduling, monitoring and load balancing the services, has huge advantages. Kubernetes eases the challenges of running in production, continuous upgrades, deployments in different availability zones for high-availability, and scaling. An additional important advantage is that it can easily be migrated between different cloud providers.
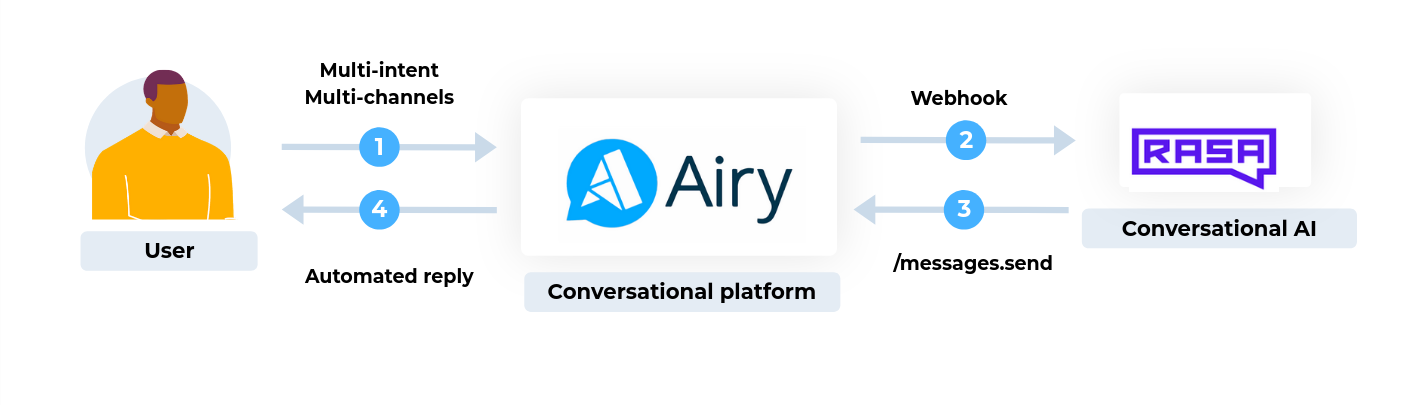
Airy & Rasa: Why two separate systems and how do they work together?
Both systems do a perfect job in their primary functionality: Rasa the open source conversational AI and Airy as the open source conversational platform. Airy can handle multiple different sources and heavy message loads, while Rasa can be optimized and trained to provide the best possible automated reply, regardless of where the message comes from.
Let's get started!
1. Create a Kubernetes cluster
To begin, you should choose your cloud provider. Airy and Rasa both run on Kubernetes, so it doesn't make any difference which provider you choose in terms of functionality. The only thing you need is to set up a Kubernetes cluster in your provider and gain access to it. We recommend to choose a fully managed Kubernetes cluster offered by one of the major cloud providers, but of course you are also welcome to manage it on your own or use an existing Kubernetes cluster.
Before you proceed, make sure that you have the Helm and Kubectl binaries installed on your local machine.
If you already have a deployed Kubernetes cluster, you can proceed to the next section.
We have prepared brief instructions on how to create a new Kubernetes cluster in different cloud environments:
1.1. Create a Kubernetes cluster in GCP
To create a Kubernetes cluster in Google Cloud, you can use either the Google Cloud Dashboard or the gcloud command line tool, which is part of the Google SDK.
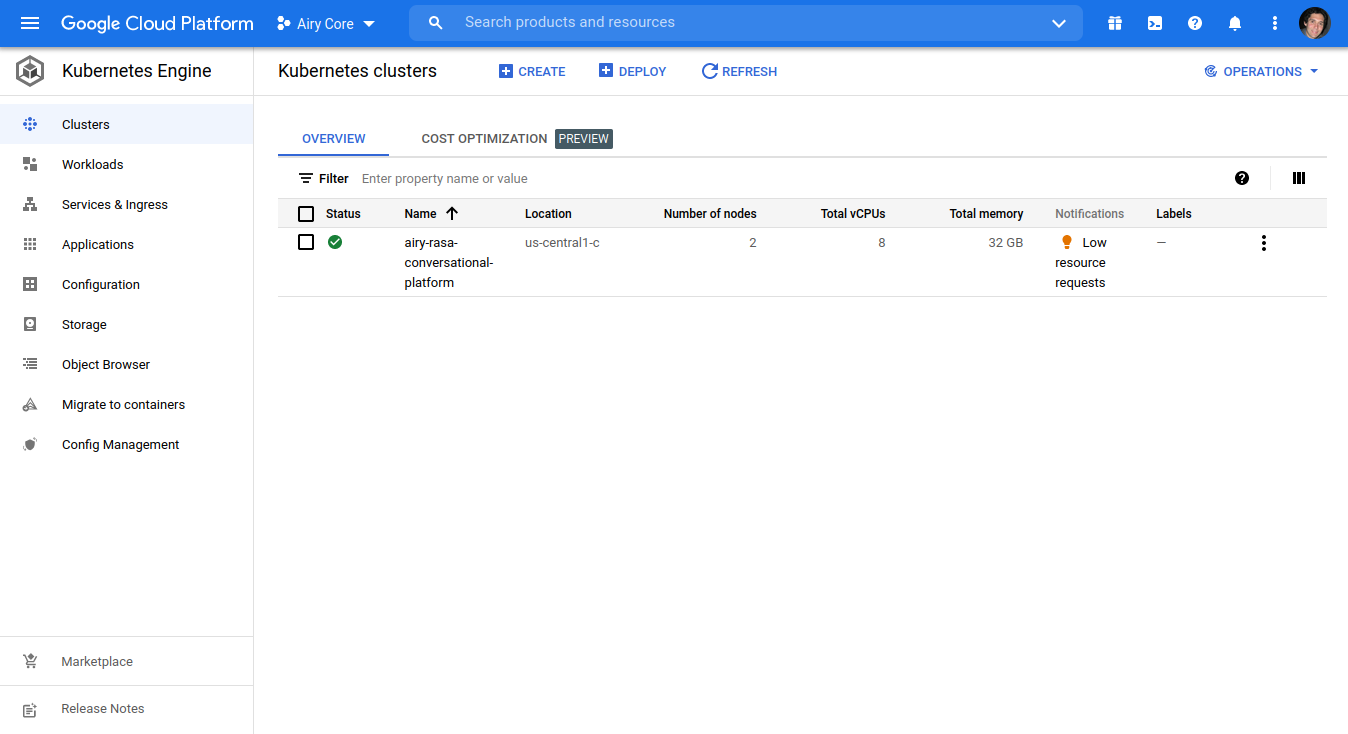
If you prefer the Google Cloud Dashboard, click on Kubernetes engine -> Clusters -> Create.
If you prefer the command line option, you should first install the Google Cloud SDK and set up your Google Cloud account for a GCP project. Then run the following command to create a Kubernetes cluster:
gcloud container clusters create airy-rasa-conversational-platform --num-nodes=2 --machine-type=e2-standard-4
After a few minutes, the details of the created Kubernetes cluster will be printed on the command line:

The command will also update your kubeconfig file.
For more information, refer to the official Google Guide.
Then you can proceed to the next section.
1.2. Create a Kubernetes cluster in Azure
For creating a Kubernetes cluster on Microsoft Azure, you can use the Microsoft Azure Portal, the Azure PowerShell utility or the Azure CLI.
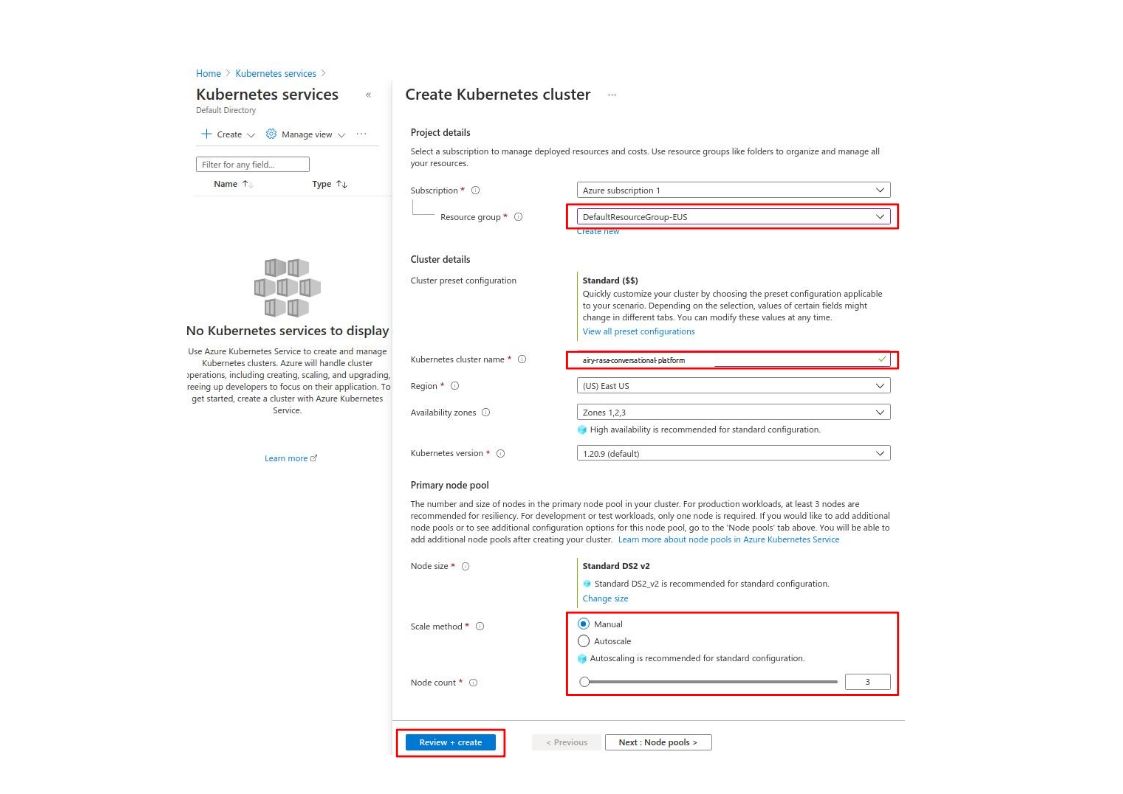
The simplest way to create the cluster is using the Microsoft Azure Portal. Navigate to the Kubernetes services dashboard and click on Create -> Create a Kubernetes cluster.
On the following screen make sure that you:
- Select the default resource group or create a new one.
- Fill in the name of the cluster (ex. airy-rasa-conversational-platform).
- Select the number of nodes.
After the cluster is created, you can use the az Azure CLI to setup access to the cluster:
az login
az aks list
az aks get-credentials --resource-group DefaultResourceGroup-EUS --name airy-rasa-conversational-platform
The last command will update your kubeconfig file with the proper credentials.
For more information refer to the official Microsoft Guide.
Then you can proceed to the next section.
1.3. Create a Kubernetes cluster in DigitalOcean
A Kubernetes cluster can be created directly on the DigitalOcean dashboard by clicking Create -> Kubernetes. You can leave all the options default, except for the Node plan as the default nodes might be too small for running the Airy Core platform.
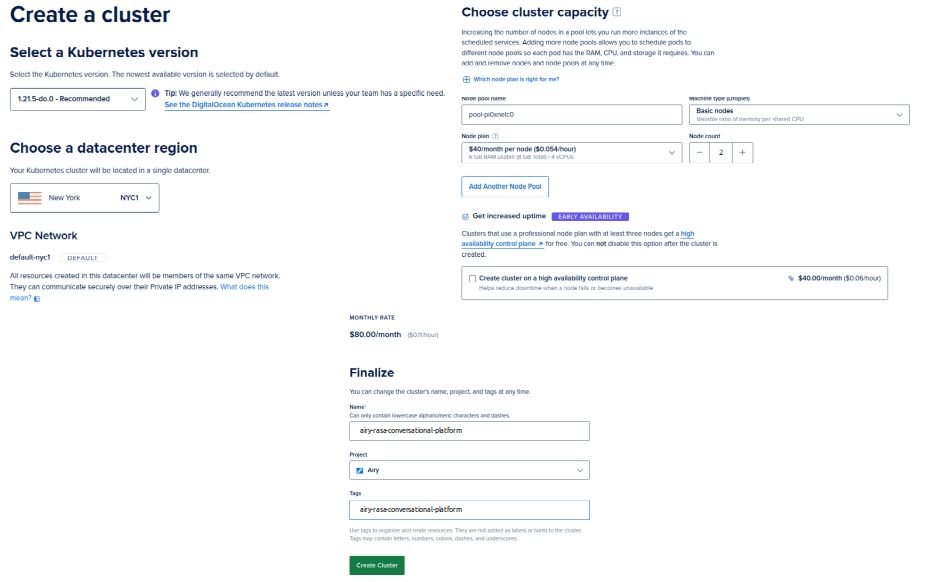
After you create the cluster you need to go through a short guided cluster setup.
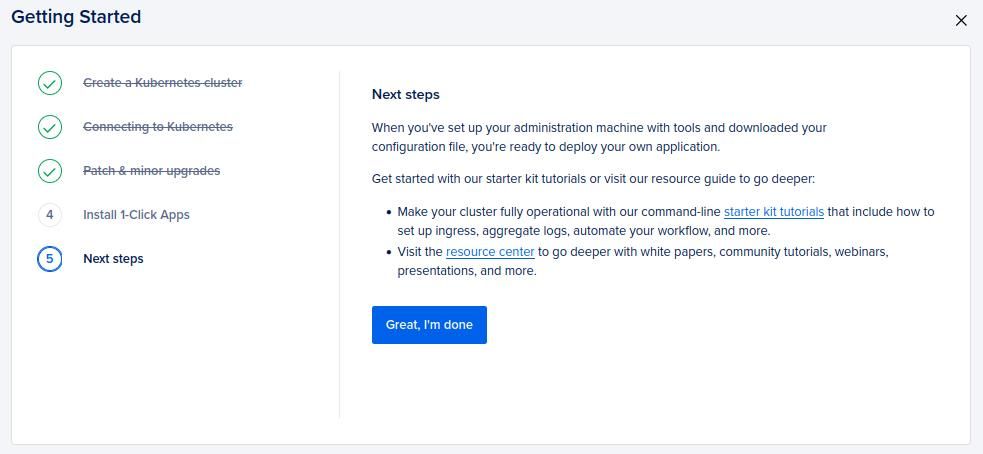
After you complete the setup you can Download Config File to save the kubeconfig file to your machine (./kube.conf). With the kubeconfig file you can now access the kubernetes cluster.
kubectl --kubeconfig ./kube.conf get pods
For more information refer to the official DigitalOcean Guide
Then you can proceed to the next section.
1.4. Create a Kubernetes cluster in AWS
A Kubernetes cluster can be created on AWS using the AWS Console or the AWS CLI.
For creating a cluster you first need an AWS IAM Role and a VPC. Export your profile and your region:
export AWS_PROFILE=my-aws-profile
export AWS_REGION=my-aws-region
Create a new AWS IAM Role and attach the appropriate policies:
export POLICY='{"Version": "2012-10-17","Statement": [{"Effect": "Allow","Principal": {"Service": "eks.amazonaws.com"},"Action": "sts:AssumeRole"}]}'
aws iam create-role --role-name airy-rasa --assume-role-policy-document "$POLICY"
aws iam attach-role-policy --role-name airy-rasa --policy-arn \
  "arn:aws:iam::aws:policy/AmazonEKSClusterPolicy"
aws iam attach-role-policy --role-name airy-rasa --policy-arn \
  "arn:aws:iam::aws:policy/AmazonEKSWorkerNodePolicy"
aws iam attach-role-policy --role-name airy-rasa --policy-arn \
  "arn:aws:iam::aws:policy/AmazonEC2ContainerRegistryReadOnly"
aws iam attach-role-policy --role-name airy-rasa --policy-arn \
  "arn:aws:iam::aws:policy/AmazonEKS_CNI_Policy"
ROLE_ARN=$(aws iam get-role --role-name airy-rasa --query 'Role.Arn' --output text)
Get the default VPC and the public subnets:
VPC_ID=$(aws ec2 describe-vpcs --filters Name=is-default,Values=true --query 'Vpcs[0].VpcId' --output text)
SUBNETS=$(aws ec2 describe-subnets --filters Name=vpc-id,Values=${VPC_ID} \
  --query 'Subnets[?MapPublicIpOnLaunch==`true`].SubnetId' --output text | sed 's/\t/,/g')
You can modify the list of subnets according to your needs, but you must have at least two subnets with the property MapPublicIpOnLaunch set to true.
Then create the Kubernetes cluster with the following command:
aws eks create-cluster --name airy-rasa-conversational-platform --role-arn ${ROLE_ARN} --resources-vpc-config subnetIds=${SUBNETS}
To update your kubeconfig file run:
aws eks update-kubeconfig --name airy-rasa-conversational-platform --alias airy-rasa-conversational-platform
For more information refer to the official AWS Guide.
Then you can proceed to the next section.
2. Deploy Airy
Airy is an open-source, fully-featured, production-ready conversational platform. Airy comes with all the components you need for all conversational use cases, from connectors to different conversational channels and sources, APIs to access your data and UIs from dashboards to an inbox.
To deploy Airy to the created Kubernetes cluster, we will use the Helm installation method.
Deploy Airy with the latest version. You can also configure a specific version.
VERSION=$(curl -L -s https://airy-core-binaries.s3.amazonaws.com/stable.txt)
If you are not using the default KUBECONFIG file (~/.kube/config) make sure you export the correct one before proceeding (in this case ./kube.conf):
export KUBECONFIG=./kube.conf
Install the Airy helm chart:
helm install airy https://helm.airy.co/charts/airy-${VERSION}.tgz --timeout 10m
Once the helm chart installs, you can confirm that all the pods are running correctly with the kubectl get pods command.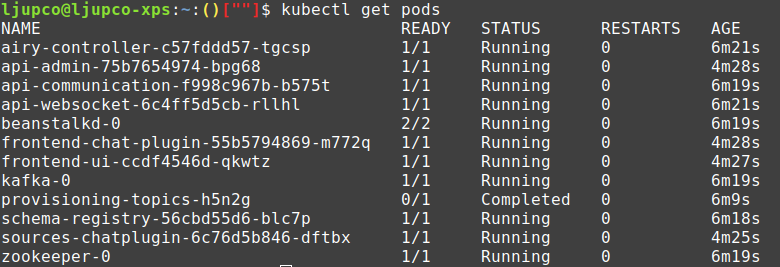
By default, Airy only creates a HTTP listener. When you run Airy in a cloud environment outside of just testing it for the purpose of this guide, it is highly recommended to set up HTTPS for your instance. Refer to the next steps section for more information.
Get the IP address of your loadBalancer:
kubectl -n kube-system get service ingress-nginx-controller -o jsonpath='{.status.loadBalancer.ingress[0].*}{"\n"}'

After you have created your Airy instance, you can access the web UI through: http://{the-loadbalancer-ip-address}.


3. Set up the Chat plugin
Next, we will create and test one conversational source.
To create a Chat plugin source, navigate to Channels and click the + button. We will call the source Letstalk.

4. Deploy Rasa
Rasa is an open source machine learning framework for automated text and voice-based conversations.
We will install Rasa open source in a separate namespace, so that there is a clear distinction between the resources created by the two platforms.
To run Rasa alongside Airy we need a specific configuration and an Airy python connector which we will load in Rasa to receive the messages from Airy and send them back to the conversational platform.
Before we run the Rasa deployment we will create some configuration in ConfigMaps, so that we can easily change them on the fly later, without needing to build a specific Rasa image.
Create the rasa namespace.
mkdir rasa
cat <<EOF > rasa/rasa.yaml
apiVersion: v1
kind: Namespace
metadata:
  name: rasa
EOF
kubectl apply -f rasa/rasa.yaml
Now we will checkout the demo repo to load the Airy module and create the proper configuration:
git clone https://github.com/airyhq/rasa-x-demo.git rasa/rasa
kubectl -n rasa create configmap actions --from-file=rasa/rasa/actions/
kubectl -n rasa create configmap channels --from-file=rasa/rasa/channels/
kubectl -n rasa create configmap data --from-file=rasa/rasa/data/
kubectl -n rasa create configmap config --from-file=rasa/rasa/domain.yml --from-file=rasa/rasa/config.yml
We need to tell Rasa where to reply to the messages, therefore we will create a ConfigMap where we will put the Airy endpoint for receiving messages (the replies coming from Rasa to the end customer).
cat <<EOF > rasa/credentials.yml
channels.airy.AiryInput:
  api_host: "http://ingress-nginx-controller.kube-system"
  system_token: "demo"
EOF
kubectl -n rasa create configmap airy-config --from-file=rasa/credentials.yml
We will amend the rasa/rasa.yaml file with the deployment and the service.
cat <<EOF >> rasa/rasa.yaml
---
apiVersion: apps/v1
kind: StatefulSet
metadata:
  labels:
    app: rasa
  name: rasa
  namespace: rasa
spec:
  serviceName: rasa
  replicas: 1
  selector:
    matchLabels:
      app: rasa
  template:
    metadata:
      labels:
        app: rasa
    spec:
      initContainers:
      - name: rasa-training
        image: rasa/rasa:2.6.3-full
        args:
          - train
        securityContext:
          runAsUser: 0
        volumeMounts:
        - mountPath: /app/data
          name: data
        - mountPath: /app/domain.yml
          name: config
          subPath: domain.yml
        - mountPath: /app/config.yml
          name: config
          subPath: config.yml
        - mountPath: /app/models
          name: models
      containers:
      - env:
        image: rasa/rasa:2.6.3-full
        args:
          - run
          - --enable-api
          - -vv
        securityContext:
          runAsUser: 0
        imagePullPolicy: Always
        name: rasa
        volumeMounts:
        - mountPath: /app/actions
          name: actions
        - mountPath: /app/channels
          name: channels
        - mountPath: /app/data
          name: data
        - mountPath: /app/domain.yml
          name: config
          subPath: domain.yml
        - mountPath: /app/config.yml
          name: config
          subPath: config.yml
        - mountPath: /app/credentials.yml
          name: airy-config
          subPath: credentials.yml
        - mountPath: /app/models
          name: models
      volumes:
      - configMap:
          name: actions
        name: actions
      - configMap:
          name: channels
        name: channels
      - configMap:
          name: config
        name: config
      - configMap:
          name: data
        name: data
      - configMap:
          name: airy-config
        name: airy-config
  volumeClaimTemplates:
  - metadata:
      name: models
    spec:
      accessModes: [ "ReadWriteOnce" ]
      resources:
        requests:
          storage: 5Gi
---
apiVersion: v1
kind: Service
metadata:
  name: rasa
  namespace: rasa
spec:
  ports:
  - name: web
    port: 80
    protocol: TCP
    targetPort: 5005
  selector:
    app: rasa
  type: ClusterIP
EOF
Create those resources in your Kubernetes cluster:
kubectl apply -f rasa/rasa.yaml
We are using the a generic rasa docker image, however we have some pre-defined data which we are using for training. The training of the Rasa automatic replies bot is done with an initContainer. We are training the bot to answer a simple scenario where the user would:
- Send a greeting (Hi / Hello)
- Inquire about the working hours (What times are you open?)
- Send a goodbye (Bye / Goodbye)
To configure multiple scenarios and rules, you can edit the data configmap and the domain.yml file in the config configMap.
kubectl -n rasa edit configmap data
kubectl -n rasa edit configmap config
After changing the configuration, the rasa pod needs to be restarted which will trigger a new training.
kubectl -n rasa delete pod -l app=rasa
We are using a StatefulSet workload for Rasa to keep the training data persistent. To see the logs from the training pod run:
kubectl -n rasa logs rasa-0 -c rasa-training
To watch for logs from the Rasa main process run:
kubectl -n rasa logs rasa-0 -f
For a better understanding of how Rasa works, refer to the official documentation.
5. Integrate Airy and Rasa
At this moment both Airy and Rasa should be installed and running. The Rasa platform is aware what messages to expect through the airy channel and knows where to respond to the relevant messages. Next, we need to tell the Airy platform where relay messages to as they come in.
We will use the integration/webhook component of Airy to send the messages to Rasa.
Let's create a configMap to start the integration/webhook component
kubectl create configmap integration-webhook --from-literal=name=webhook --from-literal=maxBackoff=10
The airy-controller watches for componentType-componentName configMaps and will then start the appropriate component. In this case, the webhook pods will start in the Kubernetes cluster. A confirmation that the pods are running can be made with the following command:
kubectl get pods -l 'app in (webhook-publisher,webhook-consumer)'
Now we instruct the webhook component where to send the messages when they come in:
curl -X POST -H 'Content-Type: application/json' http://{the-loadbalancer-ip-address}/webhooks.subscribe --data '{"url":"http://rasa.rasa/webhooks/airy/webhook"}'
Note that Airy and Rasa talk through the internal Kubernetes services, as they are running in the same Kubernetes cluster.
6. Test everything
To test that everything is working properly, we will simulate writing messages to the chat plugin source as if they come from actual end customers.
The URL for the chat plugin client demo can be found at:
http://{the-loadbalancer-ip-address}/chatplugin/ui/example?channel_id={chatplugin_channel_id}
To get the chatplugin_channel_id on the channel which you created, you should go to Channels -> Click on the channel -> Edit -> Install & Customize and then copy the w[n].channelId property as on the next screenshot.
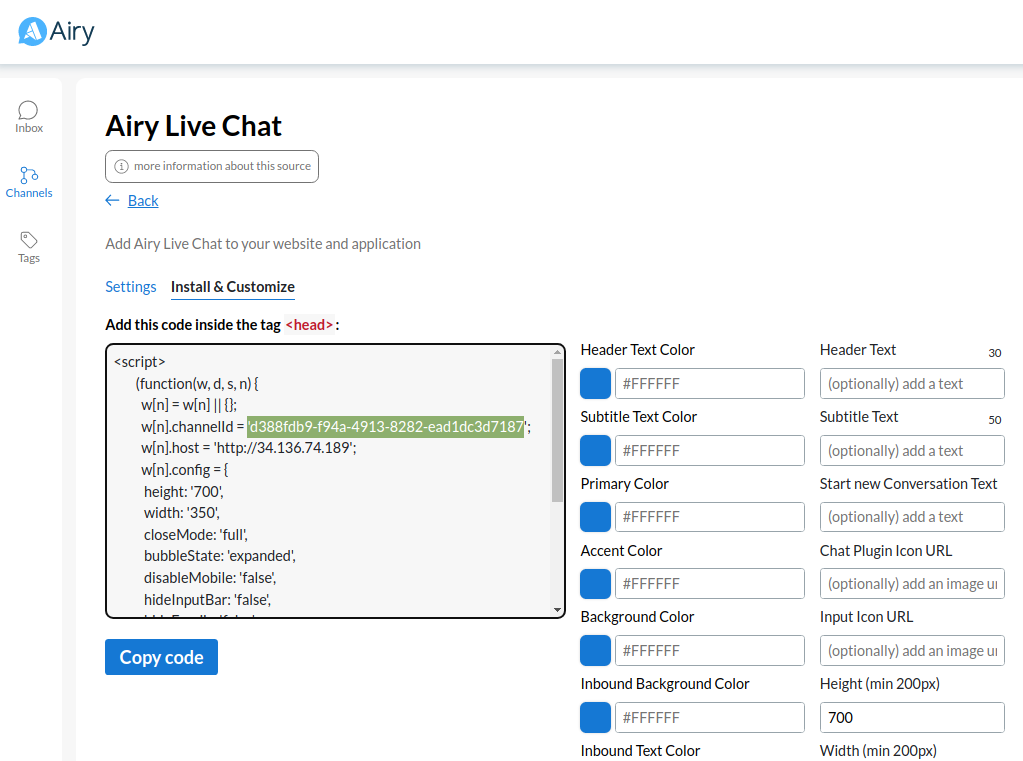
Then write to the channel and you should get automated replies.
For example:
Hello
What times are you open?
Bye
On the following screencast we have opened two screens in parallel: the first screen (on the left) with the Airy Inbox where all the messages from all the channels are coming in and the second screen (on the left) where we have the chat plugin client demo where we can write to the chat plugin as an end customer.
There we can see the automated replies from the Rasa automation.
What is next?
Congratulations! You are a conversational developer now.
-
Join the community - Chat with other conversational engineers and stay up to date on the latest developments - join our Slack community.
-
Secure your installation - The demo doesn't offer any encryption, so before you connect any actual sources - you should secure your
Airy Coreinstallation - https://airy.co/docs/core/getting-started/installation/security -
Connect multiple channels -
Airysupports a variety of sources such as Facebook, Google Business Messenger, WhatsApp and SMS. Refer to the Sources documentation page to see how to connect them - https://airy.co/docs/core/sources/introduction -
Expand the capabilities of Rasa -
Rasais a very powerful tool and in one of our previous blog posts we explain how to get the most out of your conversational AI and customer support by having your AI suggest likely responses and then training it on the selection that customer support makes.
Official websites and documentation: